
We've designed the Food environment assessment tool (Feat) to be intuitive and simple to use. However if you're stuck, here's a guide to the basics, as well as some more advanced functions. New features were added in September 2019.
The easiest way to get started in Feat is to use the 'Search' box. You can search for a Local Authority or Ward by name, or a middle super output area (MSOA) or lower super output area (LSOA) by name or code (e.g. Carlisle 007 or E02003993). Feat will warn you if it can't find the area you're looking for. The geographic area currently being displayed will be shown in the Current level panel. You can then navigate and zoom as normal.
If you want to zoom out but preserve the geographic boundary (Local Authority, Ward, MSOA, LSOA) currently being displayed, click 'Lock level' in the Current level panel. You will then be able to zoom out five zoom levels (five clicks of the zoom out button), before Feat defaults to the next largest geography to display. Feat has to default to displaying the next largest geography after zooming out more than five levels because there are limits to how much data we can feasibly show. If you zoom out to show too much data (approximately more than 80,000 boundaries), you will receive a notice to zoom back in.
 |
 |
 |
||
| You display LSOA data for your chosen area | You zoom out five zoom levels. LSOA data are still displayed | You zoom out six levels, Feat defaults to displaying a higher-level geography (e.g. LAs). |
It is also possible to navigate the food environment through time using the 'Food outlet data from' drop down menu in the Settings panel. We add new data every month.
See our Basic functions 'how to' video for more information.
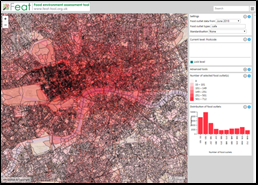
Use the 'Food outlet types' drop down menu in the Settings panel to choose the type of food outlet data you want to display. Or, choose multiple types of food outlet to get a wider picture of food outlet access.
As you move your cursor across the visible map extent, the Current level panel will show the name and code (if applicable), as well as the count of the number of food outlets selected within each area.
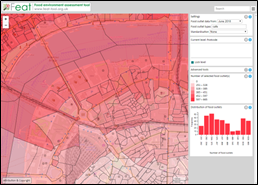
The Number of selected food outlet(s) panel displays a legend to help you interpret the map. The legend always relates to the visible map extent or the current selection (see Creating custom selections below), and displays quintiles of numbers of food outlets, in addition to those with zero outlets. Quintiles divide the total number of areas shown into five groups, meaning that each group in the legend contains 20% of the areas shown in the visible map extent.
The Distribution of food outlets panel provides you with further information in the form of a histogram showing the distribution of selected food outlet type(s) across the visible map extent. This can be particularly useful for objectively comparing areas, or for quickly identifying the range of exposures within the visible map extent. The histogram is not shown if fewer than 20 polygons are displayed within the visible map extent.
Displaying counts of food outlets is the default in Feat. Therefore, you will notice that None is selected automatically in the 'Standardisation' drop down menu in the Settings panel.
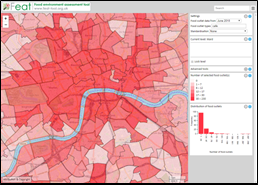
However, Feat also allows standardisation of food outlet counts by Resident population. The number of food outlets (of the type(s) you have chosen to display) is displayed per 1,000 population in each area. The legend and distribution panels are automatically updated. In the Current level panel, moving your cursor over the visible map extent shows the count of selected food outlets, the resident population, and the ratio of food outlets per 1,000 population (e.g. 9/6281 (1.43/per 1k pop.)).
To show reference boundaries (higher level boundaries that contain the areas you are currently viewing e.g. LSOAs being shown with higher level MSOAs overlaid), start by expanding the Advanced tools panel and check 'Show reference boundary at level'. Country boundaries will be displayed by default, but other higher level boundaries are selectable from the drop down menu. Boundaries at a lower level than you are currently viewing are not selectable and will be greyed out.
See our Show reference boundaries 'how to' video for more information.
Custom selections of areas can be used to obtain data for a specific region of interest, and for making comparisons with other regions, as the map legend, histogram and Summary data will automatically update to reflect your selection. Custom selections can also be saved for later or to share (see Exporting and importing selections below). Feat gives you three easy ways to create custom selections.
Don't forget that you can mix-and-match these selection methods to create custom selections, and that custom selections do not have to be in just one area (including within the currently visible map extent) or contiguous. To edit a custom selection after 'Us[ing] selected set to analyse', shift the map extent slightly. Selected boundaries will once again be shown in green, ready for further editing. To start over, click 'Deselect all'.
We understand that you've invested time creating a custom selection, so we wanted to let you save it for next time,
or to share with another Feat user. When you're happy with your selection, click the menu icon (![]() ) and choose 'Export selected set'.
This will save your selection as a geojson file, most commonly to your Downloads folder. To load a previously
exported selection, choose 'Import selected set' from the same menu, and navigate to the geojson file location. Note
that Feat won't automatically zoom to this imported selection, and these selected areas may also be hidden by higher
level boundaries (e.g. an imported selection of LSOAs will be hidden by higher level MSOAs until the LSOA level is
zoomed to by the user). As a result, you will be prompted on import to see the 'Boundary select level is set to'
dialogue (shows the geographic level of the imported selection, which you will need to auto-zoom to) in Advanced
tools, and to use 'Show set' (shows a list of imported boundaries by name, which you will need to pan to), to locate
the imported selection on the map.
) and choose 'Export selected set'.
This will save your selection as a geojson file, most commonly to your Downloads folder. To load a previously
exported selection, choose 'Import selected set' from the same menu, and navigate to the geojson file location. Note
that Feat won't automatically zoom to this imported selection, and these selected areas may also be hidden by higher
level boundaries (e.g. an imported selection of LSOAs will be hidden by higher level MSOAs until the LSOA level is
zoomed to by the user). As a result, you will be prompted on import to see the 'Boundary select level is set to'
dialogue (shows the geographic level of the imported selection, which you will need to auto-zoom to) in Advanced
tools, and to use 'Show set' (shows a list of imported boundaries by name, which you will need to pan to), to locate
the imported selection on the map.
See our Exporting and importing selections, and Summary data 'how to' video for more information.
Don't forget that at any time you can hover over the information icon (![]() ) for details on each function. This can be
particularly helpful for Advanced tools. Our series of 'how to' videos might also help if you get stuck!
) for details on each function. This can be
particularly helpful for Advanced tools. Our series of 'how to' videos might also help if you get stuck!
To show more of your chosen geography, try zooming out as far as possible to the point where Feat would normally automatically display the next largest geography, before selecting 'Lock level' and then zooming out up to five levels.
The Settings, Current level, Advanced tools, Number of selected food outlet(s), and Distribution of food
outlets panels can all be collapsed using the collapse icons ( ). This is particularly useful if you're working on a smaller screen,
or just want to de-clutter your display.
). This is particularly useful if you're working on a smaller screen,
or just want to de-clutter your display.
Pressing F11 on your keyboard allows Feat to enter full screen mode. This is particularly useful if you're working on a computer with a small screen and need to maximise the visible map extent. To exit full screen mode, press F11 again.
The best way to export high resolution maps from Feat is to Print Screen + Paste, while viewing Feat in full screen mode (by pressing F11).
Don't hesitate to send the Feat development team an email (feat-tool@mrc-epid.cam.ac.uk) if you have any questions. We're more than happy to help.